

The Roam iOS SDK makes it quick and easy to build a location tracker for your iOS app. We provide powerful and customizable tracking modes and features.
What is the Roam SDK?
Roam SDK is a convenient Software Development Kit that helps you easily add location tracking to your app without the complexity of REST API calls. Our main product offers accuracy, battery efficiency, and customizable location tracking with the following additional features:
- Always-on location tracking to track users’ location at all times regardless of the application state (foreground, background, terminated)
- Offline location tracking to track users’ location when they are not connected to the internet.
- Location spoofing prevention prevents your users from faking their location.
- Location tracking modes to customize the setup and optimize battery usage and data collection frequency.
Prerequisites
The following are the prerequisites for the Roam SDK installation.
- To use the Roam SDK, Get yourself a free Roam Account. No credit card is required.
- Create a project and add an iOS app to the project.
- You need the PUBLISHABLE_KEY (available in your project settings) to initialize the SDK.
Now, you’re ready to integrate the SDK into your iOS application.
Note: The Roam iOS SDK requires Xcode 10.0 or later and is compatible with apps targeting iOS version 10 and above.
Xcode Setup
To integrate the Roam SDK, you need a Roam account.
- Go to Xcode > File > New Project
- Configure the information property list file Info.plist with an XML snippet that contains data about your app. You need to add strings for NSLocationWhenInUseUsageDescription in the Info.plist file to prompt the user during location permissions for foreground location tracking.
- For background location tracking, you also need to add a string for NSLocationAlwaysUsageDescription and NSLocationAlwaysAndWhenInUseUsageDescription in the same Info.plist file.
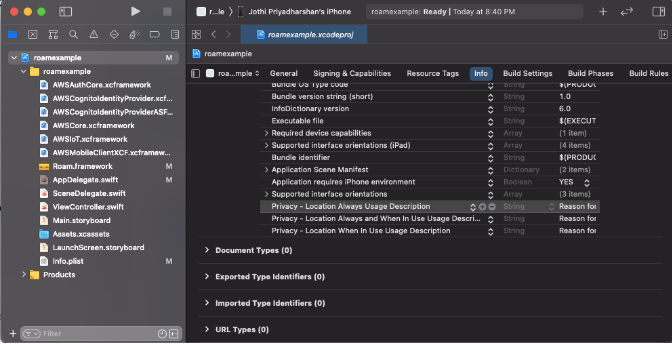
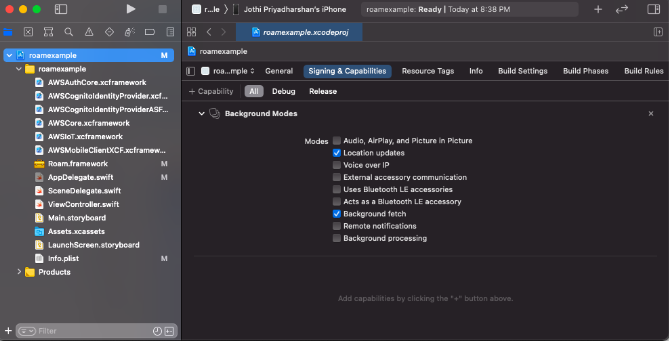
Next, you need to enableBackground fetch and Location updates under Project Setting > Capabilities > Background Modes.
Roam SDK Installation
There are several ways to integrate the Roam Mobile SDK for iOS into your own project:
- Swift Package Manager
- CocoaPods
- Carthage (Will be added soon)
- Dynamic Frameworks
Swift Package Manager Installation
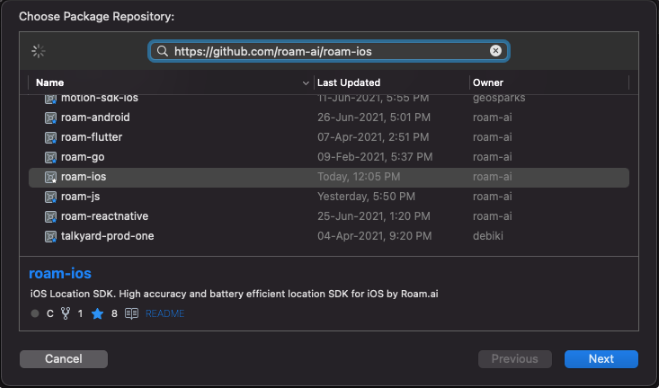
Swift Package Manager is distributed with Xcode. To start adding the AWS SDK to your iOS project, open your project in Xcode and select File > Swift Packages > Add Package Dependency.

Enter the URL for the Roam SDK for iOS Swift Package Manager GitHub repo into the search bar and click Next.
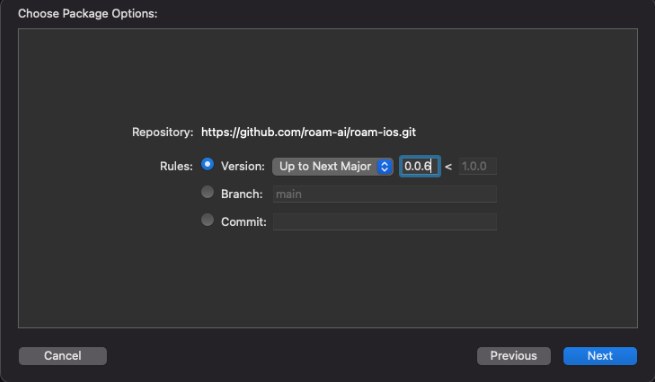
You'll see the repository rules for which version of the SDK you want the Swift Package Manager to install. Choose the first rule, Version, and select Up to Next Minor as it will use the latest compatible version of the dependency that can be detected from the main branch, then click 'Next'.
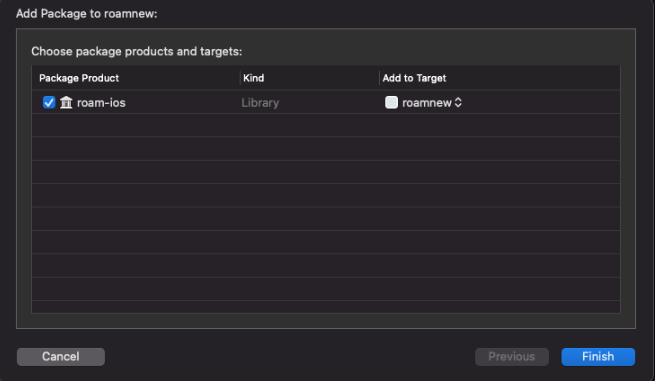
Select roam-ios, then click 'Finish':
You can always go back and modify which SPM packages are included in your project by opening the Swift Packages tab for your project: Click on the Project file in the Xcode navigator, then click on your project's icon, then select the Swift Packages tab.
CocoaPods Installation
Follow the steps below to add the SDK to the project using CocoaPods. Add the below to the Podfile
Then run pod install.
This will add the Roam SDK and its dependencies to your project. The Roam SDK depends on CoreLocation, AWSMobileClient and AWSIoT for fetching locations and its transmission to our servers. The SDK supports iOS 10 and above.
Manual Installation
If you’re not familiar with using Cocoapods or prefer manual installation, we’ve added a ZIP file to the SDK. Use this link to download the Roam.zip file.
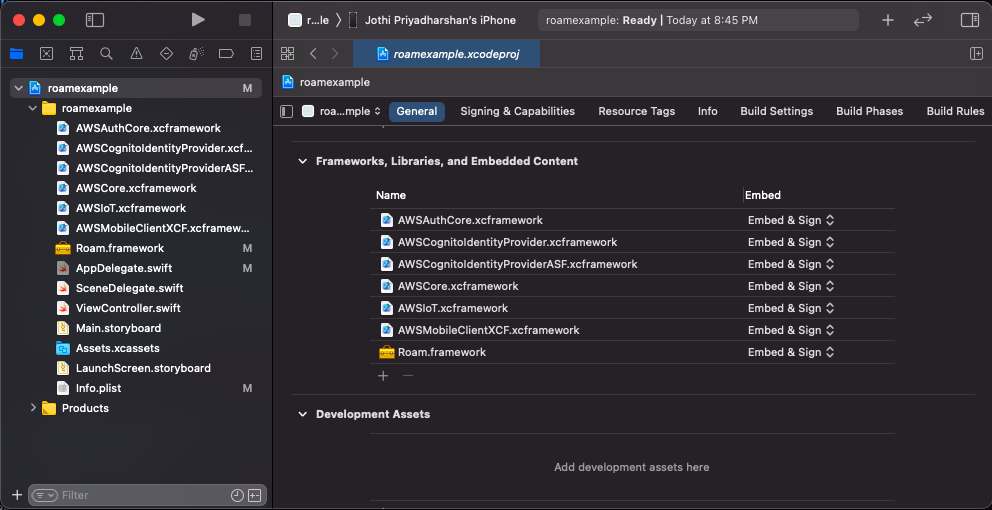
Unzip the file and add the Roam Roam.framework to your Xcode project by dragging the file into your Project Navigator.
You can do this by selecting the project file in the navigator on the left side of the Xcode window, and then navigating to the Linked Frameworks and Libraries section. From there, click the “+” button to add the Roam framework. You will also want to add the following frameworks from this link.
Make sure the added frameworks under the Linked Frameworks and Libraries sections are selected as Embed & Sign.
Initialize SDK
Add the following code in AppDelegate file. This code imports the SDK and allows the SDK to use other methods.
After import, add the below code underapplication(_:didFinishLaunchingWithOptions:) in your AppDelegate file. The SDK must be initialized before calling any of the other SDK methods using your project's publishable key.
Create User
Once the SDK is initialized, you need to create or get a user to start the tracking and use other methods. Each user created will have a unique Roam identifier which will be used to login and access developer APIs. We call this the Roam user_Id.
The "user description" option can be used to update user information such as name, address or add an existing user ID. Make sure the information is encrypted if you are planning to save personal information like an email ID or phone number.
You can always set or update user descriptions and meta-data later using the code below.
Get User
If you already have a Roam user_ID that you would like to reuse instead of creating a new user, use the code below to get a user session.
Request Permissions
Before you start location tracking, ensure that you have user permissions for your application to access locations.
1. Import CoreLocation at the top of the AppDelegate file.
import CoreLocation
2. Make the below class declaration for Location Manager and add this line before the return statement in application(_:didFinishLaunchingWithOptions:) With this line, you ask users to allow the app to access location data both in the background and the foreground.
Location Tracking
Start Tracking
Use one of the tracking modes while you use the Roam.startTracking method.
Stop Tracking
To stop the tracking use the method below.
Want to know how Roam provides location solutions?
Thank you for reading! If you want to learn more about our Location SDK for iOS then check out our docs page's here.